
Site Speed is very important for every blog or site, especially for those who use virtual hosting. It is the cheapest option for hosting services. This article includes a few tricks for .htaccess and the header.php, which will help you to increase the speed of loading your site up to 50-70%.
Web developers are paying more attention to performance, which is now one of the hottest topics in web development. Download speed – It’s more than just an option. Speed – The most important parameter. If your site or blog is slow, people will not visit it.
What does speed mean for large web projects?
- For the Google – The increase of boot time by 500 milliseconds, leads to reduce the number of searches by 20%.
- For Yahoo – The increase of load time by 400 milliseconds leads to a 5-9% increase in the number of people who click “back” before the page is loaded.
- To Amazon – The increase of boot time by 100 milliseconds leads to a 1% decline in sales.
Google is seeking to make the web faster. They wrote in their blog post that “we have decided to take the load speed of the website into account in our search rankings.”
So if your site is slow, it can worsen your position in the search results.
Thus, the loading speed is very important. CDN (Content Delivery System) is good for the purpose, but to a certain level, and good CDN providers are a little expensive.
The good news is that some of the most important speed optimization can be done using simple tricks in .htaccess. They can make any site load more quickly, compressing content, and including caching browser match the recommendations to accelerate the Yahoo site, and will not cost you a dime.
Step 1: Gzip file compression
Compression reduces response times by reducing the size of the HTTP response.
It is necessary to compress your HTML documents, scripts and style sheets using gzip. Moreover, it is necessary to compress any text response including XML and the JSON.
Images and PDF files do not need to compress using gzip because they are already compressed. Attempts to do so will only increase the load on CPU, and may even increase the size of the file.
Compressing files also save a bit of bandwidth.
With .htaccess
For servers with Apache
mod_pagespeed module: Apache, Google can be used as other modules.
You can simply copy and paste the following code in your .htaccess file:
<IfModule pagespeed_module>
    ModPagespeed on
    # using commands,filters etc
</IfModule>
Many of you are hosted in other web hosting providers that do not support mod_pagespeed module.
You can use the mod_deflate module (the Apache 1.3x used mod_gzip , but since Apache 2x, use mod_deflate ).
<ifModule mod_deflate.c>
    AddOutputFilterByType DEFLATE text/html text/plain text/xml application/xml application/xhtml+xml text/css text/javascript application/javascript application/x-javascript
</ifModule>
With header.php
If your server does not support mod_deflate or mod_gzip , you can use this PHP script for gzip compression, and it runs on Apache, and Nginx.
Just copy it to the header.php file of your theme:
<?php

if ( substr_count( $_SERVER['HTTP_ACCEPT_ENCODING'], 'gzip' ) ) {

    ob_start( "ob_gzhandler" );

}

else {

    ob_start();

}

?>
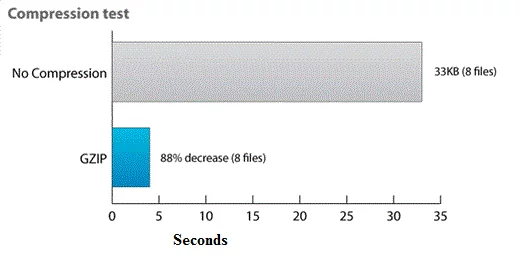
Below is a chart which shows the load of my site with and without gzip compression.
Step 2: Disable ETags
ETags (the Entity Tags – tag objects) – A mechanism that web servers and browsers use to determine if a component in the browser cache is the same as the original. ETags are been added as a mechanism to verify the relevance of the objects.
This method is more flexible than the check date of last change. ETag – a string that identifies a particular version of the component. The only restriction is that the string must be quoted. The main component of the server determines ETag using the ETag header.
To disable ETags, insert this into your .htaccess file:
Header unset ETag
FileETag None
Step 3: Using the browser cache
With the use of caching browser, we give full instructions on work with certain files on a specific time period. When a file is needed again, the browser gets it from its local cache instead of having to request it from the server again.
Job Site without caching is about as much sense as driving to the store with a glass of water whenever thirsty. Not only it is impractical and short-sighted, but also requires a lot of effort!
The Caching browser is really convenient to get users to come back, that is, it can create a base of loyal visitors that will also save a lot of your bandwidth.
The visitor who comes to your page for the first time, make a few HTTP requests to upload files to your site, but by using the header Expires and the Cache-Control, you make these cached files. This will help you to avoid unnecessary HTTP requests on subsequent page views.
For servers with Apache
Apache uses mod_expires and mod_headers modules.
- mod_expires Module monitors HTTP Expires header setup and operation term guidelines for the HTTP header Cache-Control HTTP in server responses. To change other directive Cache-Control, you can use the mod_headers module.
- mod_headers Module describes the directives to control and modify HTTP header request and answers. Headers can be combined, removed or replaced.
Add these rules in the .htaccess to set Expires for the header:
# BEGIN Expire headers
<ifModule mod_expires.c>
    ExpiresActive On
    ExpiresDefault "access plus 5 seconds"
    ExpiresByType image/x-icon "access plus 2592000 seconds"
    ExpiresByType image/jpeg "access plus 2592000 seconds"
    ExpiresByType image/png "access plus 2592000 seconds"
    ExpiresByType image/gif "access plus 2592000 seconds"
    ExpiresByType application/x-shockwave-flash "access plus 2592000 seconds"
    ExpiresByType text/css "access plus 604800 seconds"
    ExpiresByType text/javascript "access plus 216000 seconds"
    ExpiresByType application/javascript "access plus 216000 seconds"
    ExpiresByType application/x-javascript "access plus 216000 seconds"
    ExpiresByType text/html "access plus 600 seconds"
    ExpiresByType application/xhtml+xml "access plus 600 seconds"
</ifModule>
# END Expire headers
.htaccess rule to set the header Cache-control:
# BEGIN Cache-Control Headers
<ifModule mod_headers.c>
    <filesMatch "\.(ico|jpe?g|png|gif|swf)$">
        Header set Cache-Control "public"
    </filesMatch>
    <filesMatch "\.(css)$">
        Header set Cache-Control "public"
    </filesMatch>
    <filesMatch "\.(js)$">
        Header set Cache-Control "private"
    </filesMatch>
    <filesMatch "\.(x?html?|php)$">
        Header set Cache-Control "private, must-revalidate"
    </filesMatch>
</ifModule>
# END Cache-Control Headers
Please note:
- There is no need to install a directive max-age with the help of title Cache-Control since it has already been installed with mod_expires module.
- must-revalidate means that as soon as the answer is aging, it is necessary to recheck; it does not mean that it will be checked each time.
Step 4: Decrease the size of a MySQL database
Since WordPress 2.6, WordPress automatically saves the entries at the time of writing. They remain in the MySQL database as the versions of the documents even after a post is saved. A large database also increases the load time of the site. I offer to give up saving versions.
Paste the following code in wp-config.php to disable the saving of multiple versions:
define('WP_POST_REVISIONS', false );
If you decide to leave this feature, you can also store the version of the database for a fixed number of days, for example, 10 days.
And one more thing, adding header expires will not affect the download speed at the first visit, but you’ll be surprised with the reduced download time for the next view of a page or visit of returning users.
Observe how your site shows the number of requests and the processing time.
Simply insert the following code after the copyright text in the footer.php file of your theme:
<?php echo get_num_queries(); ?> queries in <?php timer_stop(1); ?> seconds.
Do you know or use some other methods to optimize the loading time of your website or blog? Do not forget to share them in the comments.
