
Sometimes things get too technical. You don’t know what you are reading. This frustrates you even more. And if this is related to your website performance then you are stumped. Let’s save you that headache. By the end of this article, you will know what is “Leverage Browser Caching” and how to fix Leverage Browser Caching Warning for your WordPress website.
Leverage literally means “to use something to maximum advantage”. Thus, Leverage Browser Caching means to use browser caching to maximum advantage.
Browser Caching
Let’s have a quick look at what is meant by Browser Caching. Whenever you visit a site, the contents of the site like HTML, CSS, images get loaded in your browser. Your browser saves some of the content locally so that you don’t need to download these files next time you visit the same site. This local storage is called Browser cache and the process is called Browser Caching.
What is meant by using Browser Cache to maximum advantage? Browser caching helps users to quickly access your website. It literally boosts the speed at which your site gets loaded on the visitor’s browser. You can set rules for browser caching so that your visitor’s browser will know how to cache your site properly. These rules can be about the time for which the resources should be stored or it can be about validating the resources.
If you use Browser Caching to maximum advantage, your page will load extremely fast. As the owner of your WordPress website, you can do certain things right to optimize browser caching and thus improve your website’s speed. We will see in this article exactly which things are needed to be addressed.
The webpage performance tools give more accurate results once you have cleared your browser cache. Before we dive further, check out this easy-to-follow tutorial about How to Clear Browser Cache.
Page Speed and Leverage Browser Caching Warning
If you are really passionate about optimizing your WordPress website, then you must have tested how much time it takes to load your website. This quest about your website performance may have landed you at tools like Google PageSpeed Insights, Pingdom, GTmetrix.
Leverage Browser Caching is one of the numerous criteria which these tools use to determine website performance. When these tools find out that you are not properly utilizing browser caching at your website end, then they show the famous “Leverage Browser Caching Warning”.
The sure way to fix this error is to leverage browser caching for your website. Let’s see how we can do that.
How To Leverage Browser Caching
When we want to leverage browser caching, there are three things we need to take care of:
- Correct HTTP Headers: This means you need to place correct HTTP headers at your web server. We will provide you with these correct HTTP headers.
- Google Analytics Optimization: Google Analytics causes errors in browser caching. We will see how to get around this problem.
- Third-Party Scripts: How do we tackle third-party scripts? How do we deal with these? Let’s figure it out in this article.
Let’s get to it step by step.
1. Correct HTTP Headers:
There are two types of Headers we need;
- Cache-control Headers
- Expires Headers
A) For Nginx Server:
Add the following code for leverage browsing caching at your server’s config block.
Cache-Control
location ~* \.(js|css|png|jpg|jpeg|gif|svg|ico)$ { expires 30d; add_header Cache-Control "public, no-transform"; }
Expires Header
location ~*  \.(jpg|jpeg|gif|png|svg)$ {
        expires 365d;
    }

    location ~*  \.(pdf|css|html|js|swf)$ {
        expires 2d;
    }
B) For Apache Server
Add the following piece of code to the .htaccess file at the top or bottom of the file (Before #BEGIN WordPress or after #END WordPress).
Cache-Control Header
<filesMatch ".(ico|pdf|flv|jpg|jpeg|png|gif|svg|js|css|swf)$">
Header set Cache-Control "max-age=84600, public"
</filesMatch>
Expires Header
## EXPIRES HEADER CACHING ##
<IfModule mod_expires.c>
ExpiresActive On
ExpiresByType image/jpg "access 1 year"
ExpiresByType image/jpeg "access 1 year"
ExpiresByType image/gif "access 1 year"
ExpiresByType image/png "access 1 year"
ExpiresByType image/svg "access 1 year"
ExpiresByType text/css "access 1 month"
ExpiresByType application/pdf "access 1 month"
ExpiresByType application/javascript "access 1 month"
ExpiresByType application/x-javascript "access 1 month"
ExpiresByType application/x-shockwave-flash "access 1 month"
ExpiresByType image/x-icon "access 1 year"
ExpiresDefault "access 2 days"
</IfModule>
## EXPIRES HEADER CACHING ##
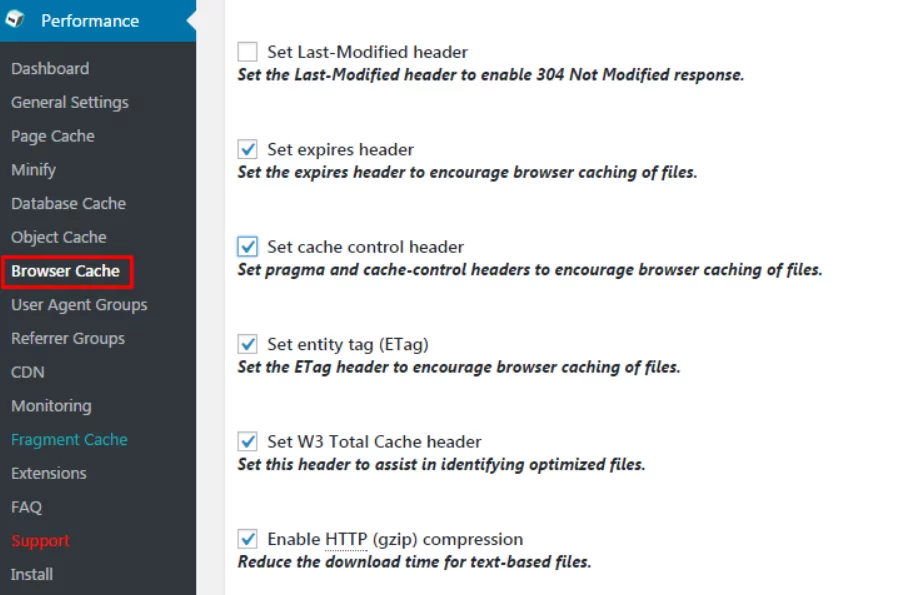
C) Using W3 Total Cache to Leverage Browser Caching
By using W3 Total Caching, you can get the same result as manually adding the code as discussed above.
To do this, Just enable browser Caching by navigating to Performance>>>General Settings
Then navigate to Browser cache and tweak settings as shown below:
2. Google Analytics and Leverage Browsing Caching:
If you are using Google Analytics, then you will still get leverage browser cache warning even after you set the headers correct. This happens because Google Analytics sets the default cache expiry time to only two hours to keep you updated.
How to deal with Google Analytics problem?

You can get around this problem by installing a plugin called CAOS (Complete Analytics Optimization Suite). It allows you to host the analytics.js file locally and keep it updated automatically. This plugin will help you make your site load faster and give you a higher score in the page speed tests on Pingdom, Google PageSpeed Insights, GTmetrix, and other tools. This happens because your browser doesn’t have to make a roundtrip to Google’s servers to download the file.
3. Third-Party Scripts
Another reason you get leverage browser caching warning is third-party scripts. You can face this warning if you are using third-party services like CrazyEgg, Hotjar, Facebook conversion pixels, etc.
There is nothing that can be done with third-party integrations. So, sit back and see how things roll out. Stop using third-party integrations if you have to. In most cases, you will need to run third-party scripts anyway. So let’s not worry about the inevitable once we have done our part.
So this was our look at “Leverage Browser Caching” problem. We hope that you have understood this concept. Sometimes technical things do tend to scare us. We hope that this article has reduced your fear of WordPress leverage browser caching. Things do get updated time to time, this includes problems and their solution. Have you found another fix for this problem? Let us know in the comments.
