
When we are working with Joomla, we get a complete ecosystem and ready to use extensions that are useful for many things. However, we do not always find what we want, or what a client needs. It also happens that sometimes we find that extensions have a mode of operation that is not what interests us. Therefore, it never hurts to get a code in hand and create extension by ourselves.
This is the first of a series in which we explain the first steps to program extensions for Joomla.
In Joomla, there are many types of extensions, from a simple library with a set of classes for doing repetitive things about an application to a template that shows an HTML we have a template to generate content.
We also have the possibility of making plugins, making engagement with Joomla, customize a generation of content, customize authentication, etc. Modules, which have a small area or a block of a website, shown in different positions, always within a template, and you can customize both the front-end and back-end parts. Finally, the components let you create a complete content management system, programming anything you want to do that is completely new in Joomla, which contains both of the front-end as part of the back-end for the administration of the components.
Requirements
If we want to program for Joomla, we need a series of elements:
- PHP runtime environment with Apache, MySQL, PHP
- Development environment as can be Sublime Text, Aptana, or PhpStorm, brackets, etc.
In addition, you need to have knowledge about:
- PHP
- Javascript and jQuery
- HTML5 and CSS
- Recommended, Git, Xdebug
Taking reference from useful knowledgebase is also recommended and for that, you can follow the official documentation of Joomla Developer where you can find lots of information. Here you can find many interesting tricks to develop Joomla in the best of conditions and with a high level of standardization.
In addition, it is worth knowing Joomla Coding Standards, to ensure that your code has quality and adequately in Joomla. The manual Joomla Coding Standards are available at https://joomla.github.io/coding-standards/
Important tips when programming with Joomla
The core of Joomla solves many doubts you may have, so if you are interested in learning how to do things right, be sure to watch.
Do not load CSS or Javascript from or within a module. Note that there are functions that let you generate more maintainable code, better-positioned websites and also the possibility that other developers modify CSS or Javascript without editing the code module itself. Note that, if you need to load jQuery, you must add a parameter in the config.
Eye with SQL queries: It has a library called jDatabaseQuery that allows you to work with a more comfortable and secure interface to write SQL by hand. Remember that in the Core you can see many examples and its use in this library. If at the end of all, you prefer to generate your own SQL, please never forget escape inject variables in queries.
Please consider using a system for autoloading to load your module classes.
Now we will see how to create a first module for this Advance content manager.
Advance CMS is very versatile and with which you can add new functionality to your web projects. In this example of creating extensions, we exemplify the creation of modules. The modules are blocks or segments of a page that placed inside templates and CMS administrator can decide by back-office where you place them, depending on the interests and the look of your site.
Now we will see how to create a module that is compatible with version 3 of Joomla and thereafter. There will be a simple “FirstModule” to enter without too many complications in this task.
Basic structure of a module
A single module made up of this directory structure and folders.
Folder tmpl, where the templates placed
File helper.php, which has a number of useful functions to get the data.
File of your_module.php, which is the entry point
File of your_module.xml, which is the Manifesto that gives information about the module and its dependencies, author, etc.
Obviously, you can change the name of your module (your_module). In our case, it will be “FirstModule”.
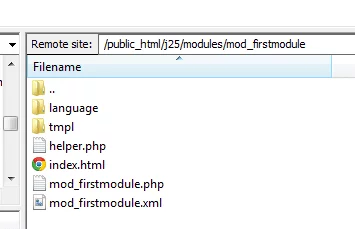
In the advance image, you find the basic structure module. In addition to the files mentioned, you will notice that there are two index.html files. They are there only for security reasons, to prevent possible directory listings if someone locates the folder and access it on an Apache that has enabled the directory listing for index folders.
For those who know MVC and by way of clarification, we can imagine that tmpl is the folder where you would place the views, helper.php would be for the model and mod_sample_module.php would act as a controller.
From here, the folder structure can evolve a lot and become much more complex. At the moment, we do not want to scare anyone and that learning is as practical as possible, so we’ll later adding elements to this structure.
file mod_ firstmodule.php
This is the entry point for a module, something like the controller module, you have to perform various tasks:
- Include helper.php (remember that this file has the features you need to use the module to collect data)
- Invoke the appropriate functions within helper.php
- Invoke the template to generate the module output.
<? Php
// we do not allow direct access
defined ( '_ jexec') or die;
// include the helper
require_once dirname (__ FILE__). '/helper.php';
// invoke functions to receive data
$ Greeting = modfirstmoduleHelper :: getGreetings ();
// Call module template
Requires JModuleHelper :: getLayoutPath ( 'mod_firstmodule');
helper.php file
Now let’s take a look at helper.php file. We organize the code through a class that has methods for each of the operations that you want to do with the data. In this case, we return a simple string but in practice generally have various functions and access them via database or when the web services performed.
<? Php class ModfirstmoduleHelper
 {
 getGreetings public static function ()
 {
 return 'firstmodule';
 }
 }
Tmpl file / default.php
The template contains a single text “Hello World” but obviously here we can put the entire HTML needed. If you need to use CSS, we shall see that the correct method of inclusion is through specific functions of Joomla. At the moment, it will suffice to write that little text.
<? Php
 // No direct access
 defined ( '_ jexec') or die; ?>
 <? Php echo $ foo; ?>
Manifesto: mod_firstmodule.xml
Let’s finish with the Manifest file, which is an XML that indicate a range of information for potential users of the module and the installer of Joomla.
<? Xml version = "1.0" encoding = "utf-8"?>
 <Extension type = "module" version = "3.1.0" client = "site" method = "upgrade">
 <Name> firstmodule </ Name>
 <Author> Name of creator </ author>
 <Version> 1.0.1 </ version>
 <Description> A "hello world" modules. </ Description>
 <Files>
 <Filename> mod_firstmodule.xml </ filename>
 <Filename module = "mod_ firstmodule"> mod_ firstmodule.php </ filename>
 <Filename> index.html </ filename>
 <Filename> helper.php </ filename>
 <Filename> tmpl / default.php </ filename>
 <Filename> tmpl / index.html </ filename>
 </ Files>
 <Config>
 </ Config>
 </ Extension>
As you see, the XML file is very much like an HTML, where data are enclosed by tags. All these files tell you things about Joomla administrator and facilitate the process module description, and also the installation.
In the <files> you can find a number of elements <filename> that have listed all the files in this module and in some cases even detail the role that those files carries.
Complete module!
Now we need to install the extension and then manage modules all from Joomla administrator. The process will be explained in detail in the future article.
