
Connected objects progressively invade our landscape, both personally and professionally. The unit cost of connected sensors allows everyone to prototype and build systems that can be complex enough quickly. The information collected can quickly become important. But often their treatment, and thus their valorization, remains a thorny problem. Similarly, the creation of value by interpreting signals and triggering derived actions can prove to be a rather complex task to implement.
Make your WordPress site’s Load Blazing Fast Just by moving to Nestify. Migrate your WooCommerce Store or WordPress Website NOW.
IBM has been working around an open sourced software solution that allows the creation of processing chains. This solution is called Node-Red (https://nodered.org/).
The aim of this solution is to allow data sources to be easily linked to processing components, local or remote, and to create value chains with a few clicks. The promise of this solution seems convincing, as AT & T also uses this project in its M2X offering as the foundation of its AT & T Flow Designer product. IBM also uses it extensively by integrating it into its offer on Bluemix and allowing execution of processing chains within its cloud environment.
So what exactly is Node-Red?
Technically, it is an application based on Node.js and allowing the design of processing strings in a Web environment. Node-Red works as an ETL: a palette of connectors, processing components, wiring possibilities amongst all this. Let’s look a little more in detail.
The components of the pallet
The component palette comes by default with a fairly complete set of connectors. There are quite classically components that can be used to input and write data, as well as several other categories: functions (split, join, range, delay, …), analysis of feeling by default), storage (file), and so on. We easily find in input and output what to build the first bases of a processing chain. The recurring types in the IoT are present (MQTT, HTTP), but the list has some shortcomings.
Similarly, the analysis section acts as a poor parent with only one component available, which is rather limited in its use.
Fortunately, this palette is only a starting point. It is possible to enrich it in several ways:
- By installing new components from the official list of Node-Red components,
- By developing its own components.
In the first case, the available catalog makes it possible to quickly cover a very broad spectrum and often sufficient for 95% of the needs. The support for the missing protocols by default is rather large. Therefore, XMPP, CoAP, etc. components will be found. But connectors are also found for complementary persistence solutions (InfluxDB, Cassandra, etc.), but also Kafka, etc. This is a pool of almost 1000 components of quality and/or variable maturity too.
In the second case, it is possible to quickly wrapper a library or a service with a custom component. The documentation clearly explains the process to be followed.
The publisher
The creation of flows is very simple: drag & drop components, configuration via a contextual panel and wiring between components. The tabbed organization allows managing a large number of flows by organizing them logically into subsets. Facilities also allow calls between flows, even if they are not present on the same tab.
The deployment of a flow
Once installed, Node-Red exposes the design UI, but also allows execution of defined flows. The publication of a flow usually ends with a deployment action. The deployment can operate in 3 modes:
- A global deployment, cancels and replaces,
- A deployment for all the components of the flow concerned,
- A deployment of only the modified components.
A simple click on the deployment button and the flows are updated and operational. Simple and efficient.
Concretely, what can we really do?
All this remains rather abstract. Here are some explanations for putting the foot in the stirrup.
My first flow
Not that it is complicated to install Node-Red locally, but at the time of the containers, it would be a shame to miss the image provided, which allows starting in seconds or even minutes. Armed with Docker, you can use the image “node-red-docker” (https://hub.docker.com/r/nodered/node-red-docker/) and start the service.
docker run -d -p 1880:1880 –name mynodered -v ~/.node-red:/data nodered/node-red-docker
Once the container is started, it is possible to access Node-Red via a browser. Depending on the port binding you choose between the container and the host, you can adapt the URL.
We can start with something simple: retrieve values from a sensor exposed via an HTTP API. You tell me, what sensor? Still need to have one on hand and what is more, able to serve HTTP requests. Such a sensor is quite simple to create yourself, starting from the now very famous ESP8266. Let us leave this electronic exercise and consider that the sensor exists and returns a JSON envelope containing several metrics (temperature, humidity, atmospheric pressure) in this simplistic form:
{

temp: {

value: 20.1,

unit: "C"

},

humidity: {

value: 72.3,

unit: "%"

},

pressure: {

value: 1020,

unit: "HPa"

}

}
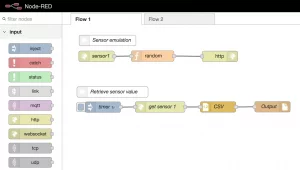
Let’s simulate the sensor first. For this, it is quite simple to create an entry point with Node-Red directly. The API will be served by Node. Some components will suffice:
- input HTTP,
- function,
- JSON
- output HTTP.
Let’s put the 4 components on the designer and start the configuration.
HTTP component (IN)
We will respond to requests of type “GET” sent on a URL (relative to the address of the Node-red server) “/ sensors / 1”.
Function
In this function, an exceptional intelligence is created which generates random values for each of the metrics and stores this in a JS object:
var sensor = {temp:{value:0,unit:"C"}, humidity:{value:0,unit:"%"}, pressure:{value:0,unit:"HPa"}};

sensor.temp.value = Math.floor(Math.random()*(40)-5);

sensor.humidity.value = Math.floor(Math.random()*100);

sensor.pressure.value = Math.floor(Math.random()*(100)+950);

msg.payload = sensor;

msg.headers={

"Content-Type":"application/json"

};
HTTP component (OUT)
A deployment (“deploy” button on the top right) allows to test this API.
curl https://localhost:1880/sensors/1
Everything works, our sensor mock is in place. Let’s attack a periodic recovery of values and a storage in a file. In a very simple and intuitive way, the components to be set up will be:
- A component able to simulate a timer: input-> inject,
- A component to call the API: function-> HTTP request,
- A component to produce CSV based on the received data: function-> CSV,
- A component to produce a file: storage-> file.
Configuring Components
We inject a value that has no particular meaning here, a timestamp for example, via the component Inject. Specifically, the time interval is specified, every 3 seconds for example, with a start at the initialization of the flow.
The HTTP component forges an HTTP request. We, therefore, choose the method to use: GET, as well as the target URL (probably in your case: https://127.0.0.1:1880/sensors/1).
The received object is mapped to a delimiter structure using the CSV component. Then we store this in a text file specifying the path (note: this path is of course in the container … do not look for it on the host, unless you have mounted a volume for this).
This simple example illustrates the ease of flow design and deployment.
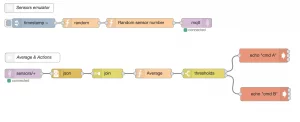
My second flow
Let us now take a step further by implementing a component traditionally used: an MQTT broker (Mosquitto here, but it is not the only one).
Still using Docker, let’s start Mosquitto:
docker run -d –name mosquitto -p 1883:1883 -p 9001:9001 eclipse-mosquitto
And restart Node-Red to take Mosquitto into account:
docker stop mynodered && docker rm mynodered
docker run -d -p 1880:1880 --name mynodered -v ~/.node-red:/data --link mosquitto:broker nodered/node-red-docker
Let us create a second flow (“+” button), named by default Flow 2. Let’s add a simulator of sensors, similar to the one created on Flow 1. The same logic here: an injector, parameterized to produce at regular intervals) a message, sending to a component generating a random message (copied and pasted from flow 1: the function component named “Random”).
Let’s send it to another Function component, this time generating a random number between 1 and 10. This number represents here a sensor identifier. It is assigned to the “topic” (“sensors /” + randomId) property to which the next component is sensitive.
This is sent to the MQTT server.
Now, let’s put us in position to consume pushed messages in Mosquitto. All that is required is an MQTT (input) connector configured to read all sent messages in a sub-topic of “sensors”. On output, since the messages are retrieved as a string, a component json transforms them into an object JS.
The “join” component then buffers according to a simple rule: create packets of 10 consecutive messages aggregated into one. The Function “Average” component calculates the averages for the 3 values of each aggregate message. Finally, the Switch component allows dispatching to different actions (here calls to commands executed on the OS) according to defined thresholds.
This second flow, a little richer, allows glimpsing the possibilities of design and the ease of definition and deployment.
In conclusion
True wealth is made possible by the community palette of components. Do you need a PID-type component to control a control system? It’s available! Accessing an InfluxDB server, rather relevant when storing and accessing time data from sensors? Also available! We also did not address the issue of error handling, default support, and the ability to cabling useful automation to handle this type of case.
The interconnection with an ecosystem of services, exposed in your IS, can also be realized in a very simple way: expose your APIs and consume them from your flows, see to create your own components to wrapper the calls to the services and make their integration simpler. To give you an idea of the form that this can take, you can test for example the components proposed by Microsoft free access (but limited) around cognitive functions (NLP, image recognition, etc.) Transpose this for example on functions complex technical simulations of an industrial system and you can see the type of service that can be offered for creating sophisticated flows.
Node-Red, although already rich, does not have as many possibilities as the industrial platforms that use it. It can, in the case of limited or non-critical deployments, be a response to itself, as well as having to hand over to much more extensive platforms, such as those cited at the beginning of the article (IBM Watson IoT Platform, AT & T M2X, etc.). ) They will not only offer highly sophisticated components (suite of “smart” Watson components based on the publisher’s AI work) but also support for high availability, terms of scalability, etc.
In the meantime, you can already initiate yourself on your own scale, on a modest Raspberry Pi and some sensors here and there in your dwelling. Some already use it massively for their home automation.
Readers note: If your website is slow and you are planning to switch to another WordPress Webhost, check out our Fully Managed WordPress Hosting Service that can make your website 30x faster!
Success!
