
Every good programmer who cares, has his worries and whims in building a good code, clean and that passes security when deploying in production. Therefore, practices like code design using TDD ( Test Driven Development ) are always welcome. But who never had doubts about what to test? What not to test? How to think about the tests first?
BDD Behavior Driven Development
Doubts like these have made software engineer Dan North develop a new methodology. Unhappy with how he developed his tests, he sought alternatives and decided to focus on the behavior of functionality rather than on unitary parts of the system. In response to TDD, Dan North created the Behavior Driven Development (BDD ).
Collaboration between areas converging to the same purpose, quality-based requirements software is one of the main pillars of BDD.
The idea within an agile team is that the person responsible for the business objectives (PM, Analyst, Designer) contributes to their knowledge about the product and the development team raises engineering doubts. It is in charge of the QA area, with a critical view on defects and failures, informing which scenarios will be tested based on accepted criteria, considering functional and non-functional requirements.
In the industry, the figure known as Product Owner (PO) has obtained a change in its role and is called Product Manager (PM).
As a result of the collaboration of these three characters, it is possible to obtain robust and detail-rich documentation that guides the development of the product that will be delivered. This documentation is called Feature.
There are several benefits of working with this methodology together with a framework that makes it possible to abstract BDD. Among them we can mention:
- Involvement of interested parties (stakeholders) in the process via Outside-in Development
- Every team aligned with the activity that will be developed
- An artifact that will be used as a guide containing the accepted criteria
- Live documentation reflecting current system behaviors
- Automated testing based on the accepted criteria itself to provide rapid feedback
Because BDD is based on the principles of TDD, it is worth remembering that there is a similar cycle in behavior-driven development.
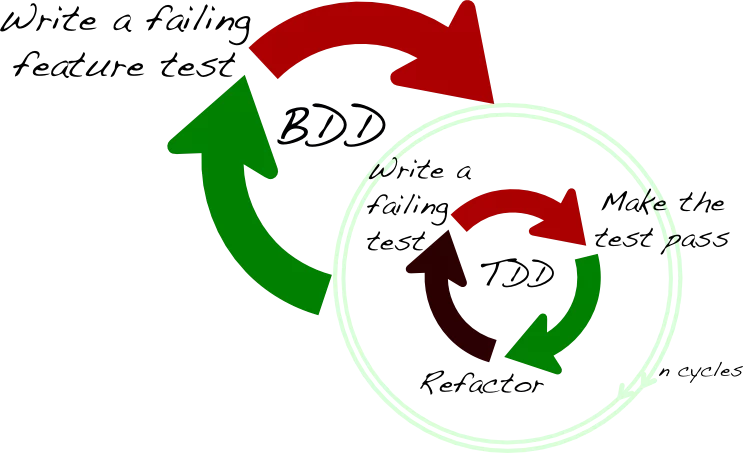
First write the test according to the Feature containing the expected behavior. The test should fail because the code does not exist yet.
Write the code according to the expected behavior described in the Feature.
Improve your code, refactor and apply best practices. The test should continue to pass, ensuring that the behavior has not changed.
Here in our organization, the QAs, together with the developers, initially write the scenarios that will be developed, the developers encode the solution, and at the end of the delivery cycle the QAs automate the specified scenarios whenever possible to increase the Acceptance tests.
There are some tools that allow you to execute the specifications described in the Feature format. Among them I can quote Lettuce, JBehave, Spinach and Cucumber. In this post I used cucumber, a tool that I worked on for some years in consulting and parallel projects.
Starting project with Cucumber
To start a project using cucumber, you need to set some gems in the Gemfile file, following the example below:
Gemfile
group :test do
  gem 'cucumber-rails', : require => false
  gem 'capybara'
end
After adding the gems, just install the dependencies specified in Gemfile by running the command:
install bundle
Then run the command to create the project directories and structure:
cucumber --init
The created structure contains directories specific to each layer that will be implemented. In the Feature directory, a file containing the extension must be created. feature, where the acceptance criteria will be written.
Features
Features writing should contain some keywords that cucumber uses to make parse through the Gherkin. The gherkin uses a semi-formal language that interprets writing and generates a regular expression capable of referencing each sentence of the specification described in the file .feature.
The Feature follows the structure below:
Title
- Description
- Who?
- What?
- For what?
Acceptance criteria or scenarios
- Pre-conditions
- Trigger
- Expected results
Key words:
- As, in order to, I want to / I would like to
- How, To, I want / I would like
- Given, When, Then, And, But, Background, Scenario, Scenario Outline
- Given that, When, Then, And, But, Context, Scenario, Scenario Scheme
Feature example:
#language:en
@login

Functionality: log in to the digital results management system

To validate authentication in the digital results management system

As a system user

I want to log in and validate administrator, manager, and executive permissions.


Context: possibility to access the system

Given that user can access the login screen of the system


Scenario Scheme: Log in to the system with valid users

When you enter a valid <User>

And enter a valid <Password>

So the system should allow user authentication

And the <Permission> type of the user should be displayed


Examples:

| User | Password Permission |

| "Jorge" | "0001" | "Administrator" |

| "Sonia" | "0004" | "Manager" |

| "Jose" | "0006" | "Executive" |
The cucumber command allows to execute a series of functions that can be informed by the command “cucumber -help”, the “-t” argument means that we will pass one tag per parameter and “@login” is the tag that will be executed, At the beginning of the feature.
A set of tags can also be passed as an argument.
Ex:
cucumber --tags @cenario1,@cenario2,@cenario3
Or
cucumber --t @cenario1,@cenario2,@cenario3
Step Definitions
After writing the feature, execute the command that will read the file .feature and identify the “steps” that should be implemented.
cucumber -t @login
By executing the command, cucumber will search the directory for the steps and steps that refer to what was written on the feature. If they do not exist, they will be displayed in the console, as the example below.
You can implement step definitions for undefined steps with these snippets:


Given (/ ^ that user can access the system login screen $ /) from the

  pending # Write code here that turns the phrase above into concrete actions

end


When (/ ^ inform a "([^"]) "valid $ /) of | arg1 |

  pending # Write code here that turns the phrase above into concrete actions

end


When (/ ^ insert a "([^"] *) "valid $ /) of | arg1 |

  pending # Write code here that turns the phrase above into concrete actions

end


Then (/ ^ the system must allow the user's $ /) authentication of the

  pending # Write code here that turns the phrase above into concrete actions

end


Then (/ ^ the type of "([^"] *) "of the user should be displayed $ /) of | arg1 |

  pending # Write code here that turns the phrase above into concrete actions

end
After the Steps are generated, it is time to create a class in the Steps Definitions directory and paste it into the steps that are generated in the console. Each step should be a developed method, given the description in the form of regular expression. Development should follow step by step.
Given (/ ^ that user can access the system login screen $ /) from the

   Visit system_rd_path

End


When (/ ^ inform a "([^"]) "valid $ /) user |

   Login_page.type_user (user)

End


When (/ ^ insert a "([^"]) "valid $ /) of the password |

   Login_page.type_password (password) .click

End


Then (/ ^ the system must allow the user's $ /) authentication of the

   Expect (page) .to have_text I18n.t ("system.index.title")

End


Then (/ ^ the type of "([^"] *) "of the user should be displayed $ /) |

   Expect (page) .to have_text I18n.t (permission)

End

Hooks
There are tests that require setup, where you are assigned code snippets that need to be run before or after you start running a scenario. This setup must be implemented in a class that we call hooks.
Below is an implementation of a hooks class used in the feature of this example:
Before '@login' do

  account = FactoryGirl.create(:account, uuid: 'kwfNGUf8G74454855548GH')

  @user = FactoryGirl.create(:confirmed_user_exemple, accounts: [account])

end


After '@login' do

  account = FactoryGirl.delete(:account, uuid: 'kwfNGUf8G74454855548GH')

end
In this case, we implemented a Before hook that will create a specific account for a given user before the first step mapped in the step is executed. This occurs because the “@login” annotation has been assigned within the Before method.
The same happens with the After method, which will only be executed after the last implemented step is executed. This method is in charge of cleaning the base, deleting the account created in the Before.
Organizing Directories
There are other ways to organize directories within the project. I particularly like to create Keep Features, Step Definitions, Hooks, Page Objects and other configuration files in well-defined directories as in the example below.

To map different directories in your project structure, simply set the path you want to the “cucumber.yml” file, as in the example below.
default: -r features/support/ -r features/step_definitions -r features/specifications
Reporting and Running Logs
The generation of logs or reports that cucumber provides is a very interesting resource to highlight the tests that were run. The information in the reports provides in detail the evidence on the scenarios, containing the records for each step.
Reports can be generated in different formats during execution, in a very simple way, using the formatting plugins: Pretty, HTML, JSON, Progress, Usage, JUnit, Rerun.
To generate the report, just assign some commands when running the scenario, as in the example below:
cucumber -t @login --format html --out report
In this report we can extract the following information about the status of the executed scenarios:
– Approved – Failed – Not executed – Number of scenarios executed – Number of steps executed – Total execution time of scripts.
XSLT Unit Testing
XSLT, which stands for Extensible Stylesheet Language Transformations, is a declarative, XML-based language used for the transformation of XML documents into other XML documents. XML and XSLT are the best tools for the job, specifically in the industries that generate large data sets.
XSLT (Extensible Stylesheet Language Transformation) is a programming language that specializes in the conversion of data structures from one form to another. It is tightly integrated with XML (Extensible Markup Language), XPath (XML Path Language), and XSD (XML Schema Definition), making it by far the best solution for the transformation of XML data objects and documents.
XSpec
XSpec is a unit test and behaviour-driven development (BDD) framework for XSLT, XQuery, and Schematron. It is based on the Spec framework of RSpec, which is a BDD framework for Ruby.
XSpec consists of a syntax for describing the behaviour of XSLT, XQuery, or Schematron code, and some code that enables you to test the code against those descriptions.
Oxygen
Oxygen provides XSLT unit testing support based on XSpec. You can easily create a test case scenario for XSLT stylesheets.
XSpec is a behavior driven development (BDD) framework for XSLT. It consists of a syntax for describing the behavior of your XSLT code and some code that enables you to test your code against the descriptions.
Using Java for unit testing
This article explains how to use Java for writing unit tests for your xslt files.
Good habits
There are good practices for behavior-oriented development BDD. Writing, for example, should avoid referencing specific interface elements. The focus should be on what the application should do and not on how it should do.
The writing of the feature can be done by QA, but the preparation of the document should not be the sole responsibility of the document. The collaboration of PM and Developers is essential for clarifying the functionalities that will be developed.
In writing the feature, it is important to be specific in each step, avoiding passing many variables, since a step can be used by other scenarios
In a next post we will talk more about good practices in writing and developing scenarios. Wait!
