
When developing a website using WordPress, we have in mind that the site will have updates, whether frequent or not. The administrative panel makes this work easier. At various times, the customer himself may want to make the changes that are necessary for the content, directly from the panel.
When you have access to the panel, you may want to customize the interface so that items and features that are not required can be hidden from the user – which ensures certain safety – and your brand (logo, colors, etc) to be exposed in this space.
There are some techniques that can be easily applied, and easy configuration of plugins that can let you do this customization in the panel. In this post, we will see how to modify the WordPress administration panel (also known as a dashboard) as per your requirement.
Login Page
One of the areas that should receive special attention when we enter the brand is the login page. Remember, all access to the panel passes through it. Here are some tips to customize it:
Replacing The Logo
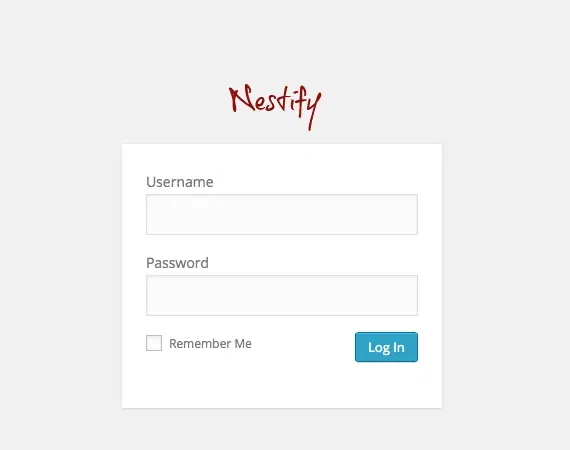
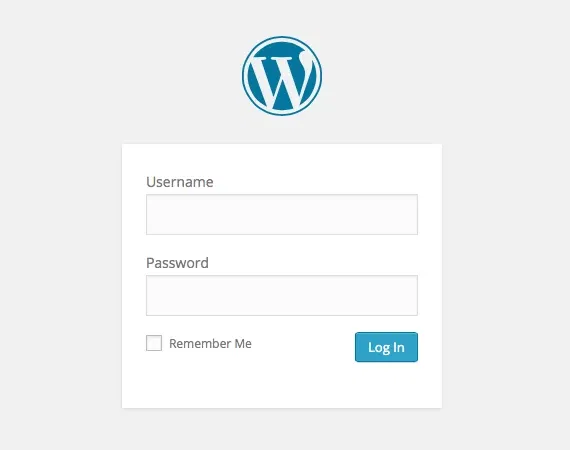
By default, the login page brings the iconic symbol of WordPress. Replacing it with your logo is super simple. Just add the following code snippet to the functions.php of your theme – changing the address of the image, of course:
add_action ( 'login_enqueue_scripts' 'yourbrand_login_logo');
yourbrand _login_logo function () {?>
   <Style type = "text / css">
      .login h1 a {
         background-image: url (<? php echo get_stylesheet_directory_uri ();?> /img/logo.png );
         height: 60px;
         width: 234px;
      }
   </ Style>
<? Php}
Note that the above function is nothing more than the inclusion of a CSS code that changes the predefined styles referring to the line that generates the logo on the login page. With this, the image will be replaced by logo.png that will be in the img folder, within your theme folder (although you can change this address) using the 60 × 234 px measures by changing the standard 80 × 80 px WordPress icon.
Logo Link
Clicking on the login page logo, you will be directed to the official WordPress site. It is interesting to change this link that, when clicked, opens the home page of your site. For the following function, make this change:
add_filter ( 'login_headerurl' 'yourbrand_login_logo_link');
yourbrand _login_logo_link function () {
   HOME_URL return ();
}
Colors and styles

Want to give even more personality to the login page? It’s simple! You just need to have basic knowledge of CSS to make appropriate changes. Using the following snippet in functions.php, define a css file that we will create and then to “run” the login page:
add_action ( 'login_enqueue_scripts' 'yourbrand_login_css');
yourbrand_login_css function () {
    wp_enqueue_style ( 'login-css' get_template_directory_uri () '/css/login.css.');
}
Note that you should only call the login.css file located in the css, within the theme folder to the login page. In this file we can customize all the elements that build the page. The available evidence, according to the Codex is:
body.login {}
body.login div # login {}
body.login div # sign h1 {}
body.login div # sign h1 a {}
body.login div # login form # LoginForm {}
body.login div # login form # LoginForm p {}
body.login div # login form # LoginForm p label {}
body.login div # login form # LoginForm input {}
body.login div # login form # # LoginForm input user_login {}
body.login div # login form # # LoginForm input user_pass {}
body.login div # login form # LoginForm p.forgetmenot {}
body.login div # login form # LoginForm p.forgetmenot input RememberMe # {}
body.login div # login form # LoginForm p.submit {}
body.login div # login form # LoginForm p.submit input # wp-submit {}
body.login div # login p # nav {}
body.login div # p # nav login to {}
body.login div # p # backtoblog login {}
body.login div # p # backtoblog login to {}
Rearranging menus
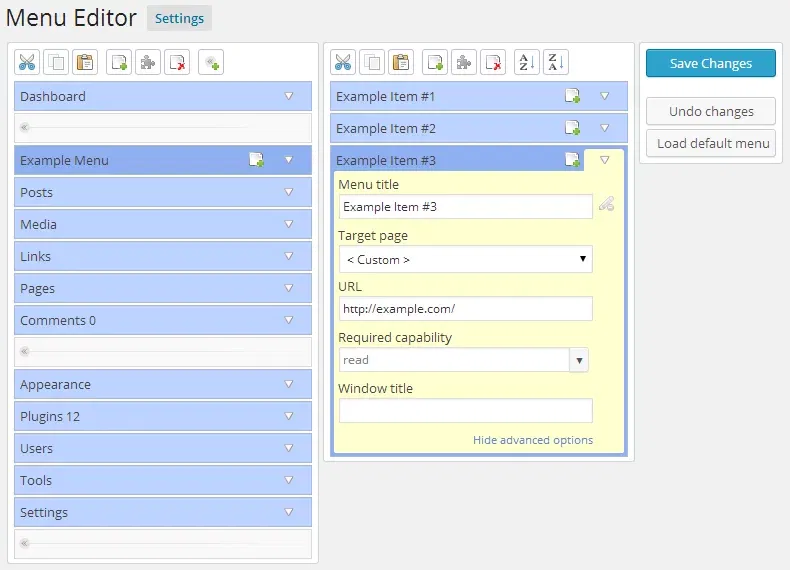
A very good tip is to leave items of the administrative panel menu. A good organization directly influences the performance of the user to perform updates on the site. To leave the most accessed menus always “in hand”, and hide or rename others which may not be interesting to the user to see, is quite simple. The following is a plugin that helps a lot in this task.
Admin Menu Editor: By using this plugin you will be able to edit an intuitive visual interface of all the WordPress menu links. Rearrange, rename, and create new menus, tabs and a multitude of customizations. Just install the plugin’s from WordPress’s own installer ( Plugins> Add New ) or download the repository and send the file contents to the wp-content / plugins folder.
footer text
Another simple but very cool tip is to replace the ubiquitous “Thank you for creating with WordPress” from panel footer with the other text of your choice. You can add a link to your portfolio, to a technical support page, or copyright. Add the following function in functions.php of your theme, replacing the text as you like (HTML tags are accepted):
add_filter ( 'admin_footer_text' 'yourbrand_footer_admin_text');
yourbrand_footer_admin_text function () {
   echo 'Created by <a href="https://www.website.com/"> yourbrand </a>.';
}
The Top Bar Logo
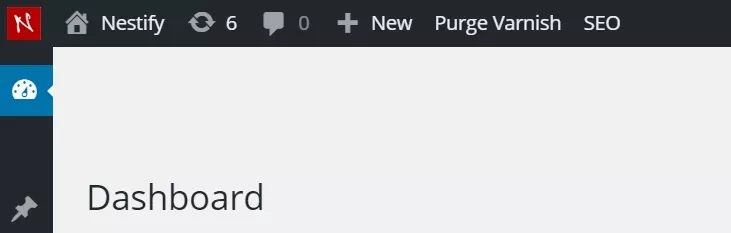
Another simple change that can give more personal touch to the panel. The following code that must be entered in functions.php that replaces the small symbol of WordPress located on the top bar. Remember, you may need to change the directory to the image, depending on your theme.
add_action ( 'wp_before_admin_bar_render' 'yourbrand_adminbar_logo', 0);
yourbrand _adminbar_logo function () {?>
   <Style type = "text / css">
      #wpadminbar # wp-admin bar-wp-logo> .ab-icon .ab-item: before {
         content: url ( '; / img / admin-logo.png <? php echo get_stylesheet_directory_uri ()?>')! important;
         top: 2px;
      }
      #wpadminbar # wp-admin bar-wp-logo> a.ab-item {
         pointer-events: none;
         cursor: default;
      }
   </ Style>
<? Php}
In conclusion
All mentioned tips are simple but as it has been said, contribute to the better performance for the user when using, and make the most intuitive experience and the visual style of your brand.
There are several plugins that can be part of the easiest way to work, but if you like to venture into the code, we recommend trying to make changes manually. As always, make a backup to ensure that you can recover the site without major headaches if something goes wrong!
