You may be new to the concept of blogging. With the plethora of blogs out there and so many people blogging, you may wonder what is a blog after all? In this article, we will not only explain what a blog is but also help you create a blog for yourself with WordPress.
What is a Blog
Simply put, a blog is a web journal. It is a type of website that features articles. This website is periodically updated as new articles are posted. This is a place where people share their opinions, thoughts, creative inputs, or anything they are good at. A blog is different from a normal business or portfolio website in several ways.
Here are the few characteristics of a blog:
- Content Management: A typical blog focuses on blog entries (blog articles, also called “Blog posts”). A blog manages blog entries in several ways. Thus, content management is an essential part of a blog.
- Newer Content First: A blog highlights the recently published content by showing it first. The rest of the content is arranged similarly (i.e. in reverse chronological order). So whenever you visit a blog, you will find the recent post featured first.
- Dynamic Nature: Unlike traditional sites, a blog is dynamic in nature. Content is added periodically to the blog. Although the frequency may vary, a blog is updated more frequently than a traditional website.
- Rich Text Formatting: When you publish content on a blog, you have ample formatting options. From traditional Bold, Italics, alignments to Headings and captions, a blog characteristically allows for rich text formatting.
- Categories and Tags: Content is organized into categories and tags. You can access the archive that lets you sort as per a specific category and tags. This helps you quickly find content relevant to a particular category.
- Comments: A characteristic feature of a blog is that it allows comments for each blog content. Comments are a useful way for visitors to interact with the blog author about the article and discuss the topic in general. Comments are often seen as a way of feedback.
- Feeds: A feed automatically syncs with your blog and updates the subscribers whenever a new post is published. Examples of feed include RSS, Atom or RDF files.
Now that you know the essential features of a blog, you might want to create a blog for yourself. There are many blogging platforms out there that help start a blog. We are now going to see how to create a blog using WordPress, the most popular blogging platform in the world.
How to Create A Blog Using WordPress
WordPress is a blogging software that you need to install on your web server. You need to have a domain name and hosting in order to publish your blog online. Apart from these added costs of domain and hosting, WordPress in itself is completely free to use.
Step 1: Install WordPress
You need to install WordPress on your web server. Installation is just a two-minute process. Many web hosts offer one-click installation. You can choose a managed WordPress hosting provider to get full advantage of your WordPress blog.
Step 2: WordPress Dashboard
Once you install WordPress, you will be greeted with the WordPress dashboard. The dashboard shows you quick links to get you started.

The options include:
- Change your theme
- Customize your Theme
- Write your first blog post
- Add an About page
- Set up your Home page
- View your site
- Manage widgets and menus
- Turn comments on or off
No need to get overwhelmed by these options. We will see how you can quickly get started with your blog in no time.
Step 3: Choose A Theme
A theme is a basic framework for your blog. A theme decides how your blog will look like. You can customize the theme after you activate it. There are so many themes available for free in the WordPress Theme Repository. Check out our list of Best Free Themes for WordPress.
A theme provides numerous options to customize. Use the customizations to the full extent to craft your blog.
Step 3: Add Pages
Before you get started with your first blog post, you should add a few pages to your blog. Two most recommended pages are:
- Home Page
- About
You can also create a custom page that you may want to showcase on your blog.
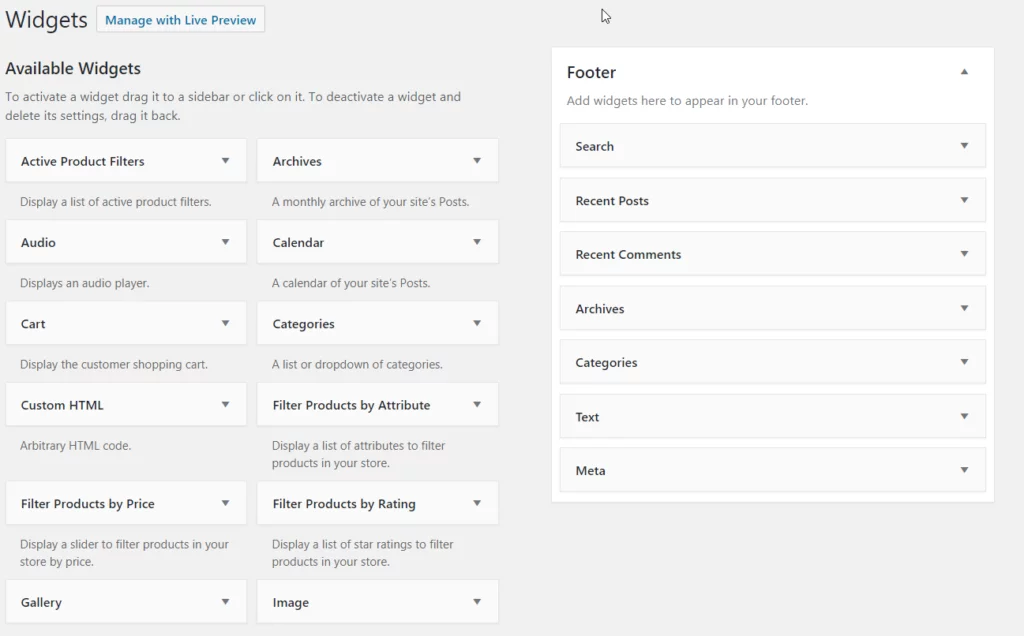
Step 4: Manage Widgets and Menus
You need to set widgets and menu options from the Appearance tab. There are extensive options available for Widgets. Some of these include:
- Audio
- Cart
- Archives
- Calendar
- Categories
- Custom HTML
- Gallery
- Image
- Meta
- Recent Posts

The menus option gives you the flexibility to choose certain pages or posts as a part of the Home page menu. You can create relevant pages and add them to the menu. You can also create different menus and name them separately. Menus help visitors to navigate the site easily.
Step 5: Add your first blog post
Once you are ready with your theme, home pages, menu, and widgets, you can now post your first blog entry i.e, blog post.
Creating a new blog post is very easy with WordPress. Click on New>> Post from the top bar. This will open up the post editor.

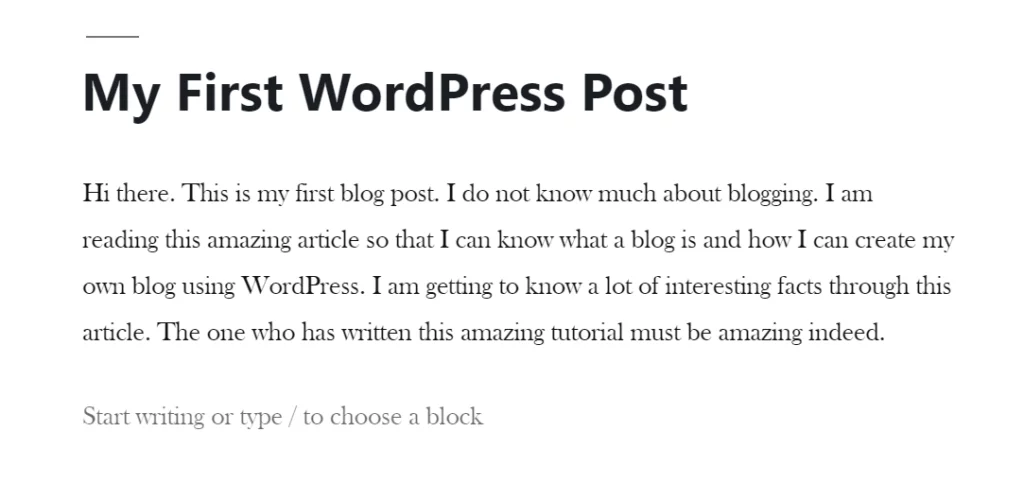
Here you can add the title for your post. For example, you can add a title and a few lines like this:

Using Blocks:
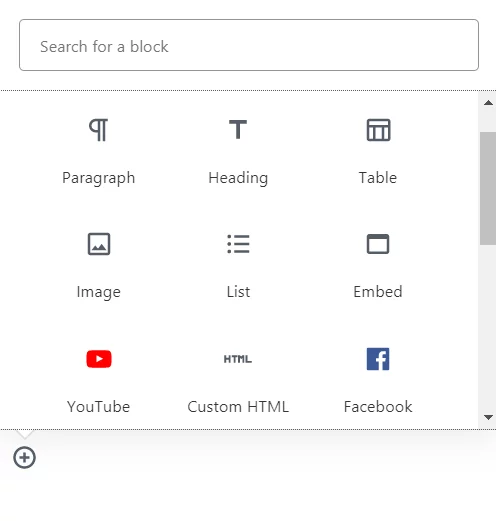
The new WordPress Editor introduces the concept of blocks. Anything you need can be added using blocks. For example, if you need to add an image, choose the image block. Need to add a heading? Choose the Heading block. There are so many blocks available for use.

Some of these include:
- Image
- List
- Gallery
- Paragraph
- Heading
- Quote
- Audio
- Video
- File
- Table
- Custom HTML
- Code
- Preformatted
Writing Content
The main part of a blog is content. Write your content in the editor and format it properly. Once the content is ready, you can preview it from the Preview tab in the right corner.
Previewing will help you get an idea about how your content will look like once published. Here you can catch formatting mistakes, e.g image alignments, heading arrangements, etc.
Publishing Options:
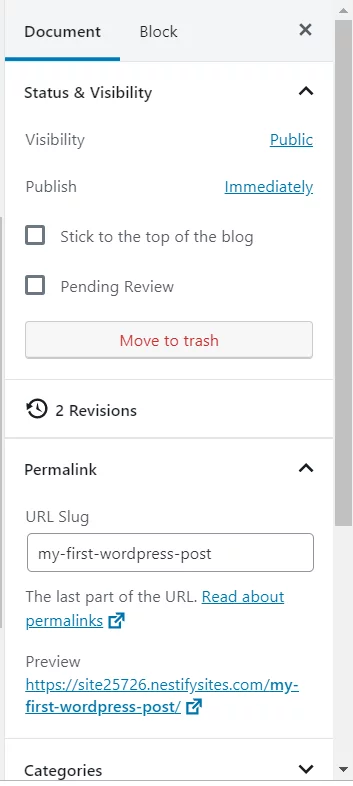
Wait before you hit that Publish button. There are a few publishing options you need to set before publishing your blog post. You will always see these publishing options each time you publish a blog post. Select these options wisely and only then publish your blog post.

WordPress offers the following options:
- Visibility: You can choose to show the post to the public, keep it private so that only editors and site admin can see it or you can password protect it so that only those with the password can see it.
- Publishing schedule: You can publish the post immediately or you can set it to be posted on a future date at the time of your choosing. This is indeed a cool feature as you can schedule multiple posts in advance for days when you don’t have internet access.
- Stick to the top: When you check this option, your blog post is always shown at the top of the blog irrespective of the other blog posts that you add.
- Pending review: With this option, you can save the post as pending so that editors can approve your post before it is published.
- Permalink: Here you can change the slug (the last part of the URL) of your blog post.
- Categories: This is an important feature of WordPress and should not be overlooked. Choose a category or create a new one from here. Categories help organize the content. Your visitors can quickly jump between categories to find relevant articles that interest them. This is very desirable.
- Tags: Tags are similar to categories. You can add multiple tags to your blog post. Tags help you navigate similar posts that have the same tag.
- Featured Image: Here you can add a featured image to your blog post. A featured image is an image that is displayed right at the beginning of the blog post.
- Excerpt: This is an optional setting. The excerpt is a summary of your blog post. If you don’t provide the excerpt, WordPress will automatically use the first 55 words as the summary of your blog post.
- Discussion: With this tab, you can choose to allow comments, pingbacks, and trackbacks.
Step 6: Publish The Blog Post
Once you have fine-tuned your blog post by considering the options we discussed above, you are ready to publish it. Hit that Publish button!
Congratulations!!! You have published your first blog post! Now you can go on publishing a few more and then even more.
Your blogging journey has begun.
Nestify is there to help you manage all the technical aspects of WordPress so that you can focus on creating awesome content.
WordPress Vs Other Blogging Platforms
There are many blogging platforms out there. Along with the popularity of blogging, numerous websites dedicated to blogging sprung up. Here we will review a few major ones.
WordPress Vs Blogger
Blogger is a blogging platform offered by Google. It’s been around for quite a few years now. It is easy to use, intuitive and you can get ready with blogging right away.
Google offers a free blogger domain name for your blog or you can link your custom domain name to your blogger account. Hosting is free, however, there are other caveats that should be considered before choosing Blogger as your blogging platform.
Check our detailed comparison of WordPress Vs Blogger to know more about the differences, advantages, and disadvantages with these two platforms.
WordPress Vs Wix
Wix is another popular blogging platform. It is essentially a drag-and-drop website builder that lets you create a website. Blogging is a functionality that you can add to your website.
Wix offers hosting for your blog at premium rates. As Wix is not a Content Management System like WordPress, there are some limitations to managing your blog content.
You can find a detailed comparison between WordPress and Wix on this blog. It can shed light on many things you might not have considered.
WordPress Vs Squarespace
Squarespace is another easy to use website builder. Although it does not have as many templates as Wix, it has competitive features that outrank many other platforms.
Still, there are significant differences between WordPress and Squarespace as blogging platforms.
Once you know the 8 crucial differences between WordPress and Squarespace, you will be able to make an informed decision about your blogging platform of choice.
Popular WordPress Plugins for A Blog
There are more than 50,000 free plugins available in the WordPress Plugin Repository. WordPress also has an ecosystem of dedicated premium plugins to offer extensive functionalities.
Here we will review essential plugins that you should consider adding to your blog so that you can get the maximum benefit from your blogging efforts.
Let’s get going:
- SEO Plugins: SEO is the most important aspect of your blog. Many SEO plugins help your content rank better in search engines. There are many popular SEO plugins out there. For example, Yoast SEO, All in One SEO, Squirrly, RankMath, etc. Check out our list of best SEO plugins you should choose from.
- Analytics Plugins: Analytics helps you understand what efforts are being fruitful. You get a clear idea about which content is trending and what you should focus on. There are numerous plugins that offer Google Analytics integration. Have a look at these top 16 analytics plugins.
- Contact Form Plugins: A contact form can take your blog to a whole new level. Just adding this functionality can help your visitors to communicate with you. Make sure you go through this list of Best Contact Form Plugins for WordPress before choosing a contact form plugin on your own.
- Security Plugins: Security is an essential aspect of any WordPress website that should not be neglected. WordPress Security plugins help you take measures for your blog’s security. Go through this list of 10 WordPress security plugins.
- Backup Plugins: It is very important that you back up your blog frequently. This comes in handy when you encounter an issue with your website. You can simply restore a backup which can be a lifesaver sometimes. Here is our list of Top Backup Plugins for WordPress.
So this was our look at blogging and how you can create a blog with WordPress. We hope this straightforward tutorial encourages you to start blogging with WordPress. Are you already blogging? Need some help? Do share your concerns with us in the comments and we will do our best to address them as soon as possible.


